Replacing Equipment Bucket Teeth | Hydraulic Magnet
Keywords: backhoe bucket teeth, bolt on bucket teeth, teeth for skid steer bucket
teeth for skid steer bucket
backhoe bucket teeth
bolt on bucket teeth
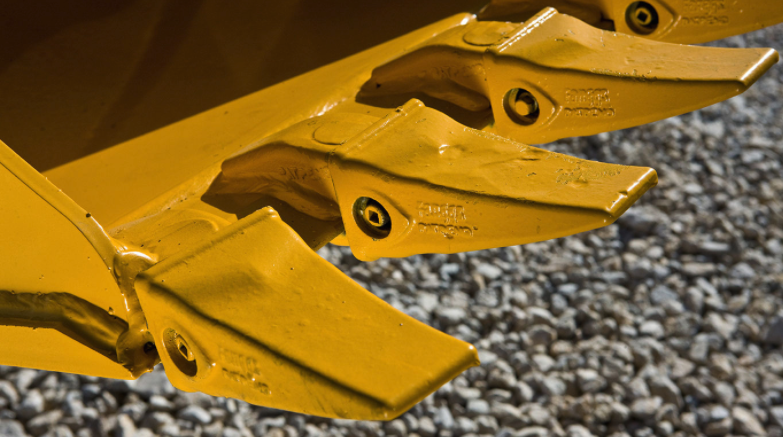
If you’re digging or moving material, bucket teeth are critical to effective excavator or loader performance. Sharp bucket teeth boost operational efficiency while reducing stress on your equipment, resulting in longer machine life and lower maintenance costs.
But keeping bucket teeth sharp and functioning properly is not always easy to do. They are some of the most easily damaged and most often replaced parts on excavators and wheel loaders, because they can break and wear prematurely. It’s important to inspect your bucket at the beginning of each shift to check for missing or excessively worn teeth, cracks, and any exposed shanks. Missing, worn, or damaged teeth will hinder digging performance and could lead to damage to the shanks or bucket itself.
As a machine owner or operator, you should replace worn bucket teeth at the first sign of any of the conditions above. To help keep your equipment operating at its full potential, we’ve put together the key steps for properly replacing loader or excavator bucket teeth.
1. Identify the Type of Teeth
The three common types of bucket teeth are:
- Chisel Teeth, used in sand and soil terrain to excavate soil, sand, and gravel
- Rock Teeth, used to excavate iron ore, rock, and hard ground and have high wear resistance
- Tiger Teeth, which provide acceptable penetration and are used for excavating compacted soils and clay
2. Determine the tooth size and direction of the roll pin
The new bucket teeth must be the same size as the previous ones to ensure the installation goes smoothly and the machine runs efficiently. Also, make a note of the roll pin’s orientation. There are two kinds of pins: top pins and side pins—the top pin must be installed vertically, while the side pin must be installed horizontally.
3. Remove the old teeth and attach the new ones
Start by adjusting the loader or excavator bucket to a position that allows you to work on it easily.
- Use a pin removal tool to pull out the roll pin and remove the old, worn-out teeth.
- Clean each shank to prepare it for the new tooth. The teeth fit over and attach to the shanks.
- Slide on each new tooth and align them with the hole through the shank.
- Insert the roll pin and hammer, or fasten it through the hole, ensuring that the pin is fully inserted.
Not all bucket teeth have the same type of tooth retainer that hold it in place. Some have vertical pins, others have horizontal pins, and a few other ones don’t even use pins at all. For that reason, it’s best to consult your owner’s manual and see what your manufacture recommends for removal methods before beginning the job.
Note: Make sure you are wearing your safety gloves when attaching replacement bucket teeth.
And you are done! Using these simple steps, you can easily replace your loader or excavator bucket teeth without professional assistance.
Replacement bucket teeth will allow the excavator and loader to dig deeper and excavate more efficiently, even under challenging conditions.